Great! Here's a step-by-step watercolor project for painting a simple mountain landscape, perfect for beginners. It uses basic techniques and gives beautiful results.
🏞️ Watercolor Mountain Landscape – Step-by-Step
🎨 What You’ll Need:
-
Watercolor paints (blue, black, green, brown, optional: purple/yellow)
-
Round brushes (small & medium)
-
Watercolor paper
-
Water container, tissue/cloth, pencil (optional)
-
Masking tape (optional but helpful)
🖼️ Final Look:
Layered mountains with mist and a colorful sky 🌄
(We’ll build it in layers from background to foreground)
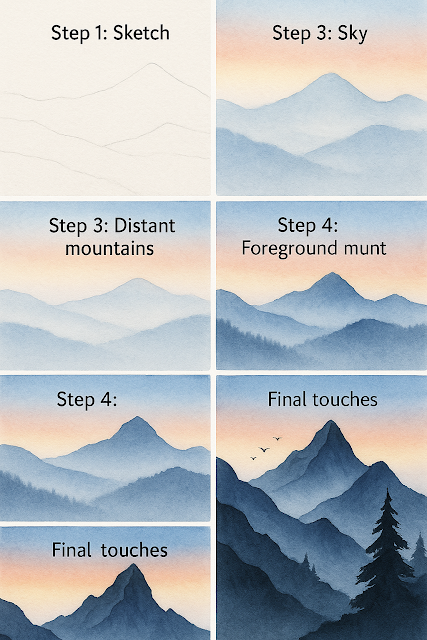
🪄 Step 1: Tape and Light Sketch (Optional)
-
Tape the edges of your paper to prevent warping.
-
Lightly sketch 3 layers of mountain outlines:
-
Farthest: lowest peaks
-
Middle: slightly higher, jagged peaks
-
Front: big close-up peaks
-
🎨 Step 2: Sky Wash (Wet-on-Wet)
-
Wet the sky area only with clean water.
-
Drop in light blue, or try a sunset blend:
-
Top: Blue
-
Middle: Pink or Orange
-
Bottom: Light Yellow
-
-
Let it blend naturally and dry completely.
🗻 Step 3: Distant Mountains (Light Tone)
-
Mix a light gray-blue.
-
Use a wet-on-dry technique: paint the farthest mountain range.
-
Softly dab the base of the mountain with tissue for mist effect.
-
Let it dry.
🗻 Step 4: Middle Mountains (Darker)
-
Mix a mid-tone blue or blue-gray.
-
Paint the next mountain layer, slightly overlapping the first.
-
Add texture by lightly dabbing with a dry brush.
-
Again, soften the base for misty layers.
-
Let it dry.
🗻 Step 5: Foreground Mountains (Darkest)
-
Mix dark blue + black or brown.
-
Paint bold, jagged peaks in front.
-
While still wet, add darker streaks to suggest cliffs or shadows.
-
Optional: Add a few trees or a cabin silhouette.
✨ Step 6: Final Touches
-
Add birds with a tiny brush or pen (just a V shape).
-
Peel off the tape carefully.
-
Sign your artwork!
🧠 Tips for Better Results:
| Tip | Why It Helps |
|---|---|
| Let each layer dry fully | Keeps layers clean and crisp |
| Use more water in distant mountains | Creates natural depth (atmospheric perspective) |
| Keep foreground details sharper | Makes painting feel 3D |
Would you like me to generate a printable PDF version of this tutorial or a visual guide image you can follow while painting?